PPC Tools

Review: The Genesis WordPress Theme Framework

Comments Off on Review: The Genesis WordPress Theme Framework Written on November 9th, 2011 by
Categories: PPC Tools

When I’m generating landing pages for PPC or SEO purposes, I’m always looking for quicker ways to deploy and maintain my personal and client sites. I’m a

The Genesis Framework

big fan of automating repetitive tasks, outsourcing, and making sure projects have less room for error and a more “templated” approach.

As WordPress is in many ways becoming the de facto standard for the back end of the web, it makes sense that things are evolving quickly in the customization of the WP platform as well.

Case in point: WordPress Frameworks.  “Frameworks” for WordPress layer on top of a base WordPress installation, and themes layer on top of the “framework”.

Reader Note:  I cover a lot of ground in this review, if you want to jump straight to my conclusions on the Genesis framework click here.

Where “Frameworks” Fit into the WordPress Ecosystem

In essence, the model looks like this:

Stock WordPress Install

—————————-

3rd Party Framework that enables customization shortcuts (in this case Copyblogger’s Genesis Framework)

—————————-

“Child” themes that adjust the look and feel of the site itself, almost like “skin” in a way.

—————————-

= Complete site flexibility

There are a few “Framework” options out there for WordPress, but Genesis is the only one I’m aware of that has been directly endorsed by Automattic, the guys who make WordPress itself.  Hopefully this means less hassles for the Genesis developers in maintaining the balance between the open-source reality of WordPress and the pay-for frameworks that make life more livable for webmasters and marketers.

Studiopress is a company that falls under the Copyblogger Media umbrella business, which of course is owned by Brian Clark, Brian Gardner and other top internet marketing professionals.  I’ve reviewed the Premise WordPress landing page system from these guys before, and highly recommend it.

StudioPress claims the Genesis framework for WordPress as being suitable for novices and advanced developers, and that the core of the framework is SEO optimized out of the box, cutting down on the time you need to spend modifying your themes and landing pages.

The Highlights

  • SEO Friendly – Genesis comes with a solid SEO based foundation, right out of the box. This means you don’t need to tinker with your theme to try and customize every little detail or remove useless code from a theme. Genesis also lets you tweak this further in the theme’s admin section.
  • Security – It seems everyday you hear about a website being hacked because of running an insecure WordPress installation. StudioPress took no chances and hired renowned security expert Mark Jaquith to make sure your Genesis powered site is secured with the latest techniques and methods.
  • Multiple Themes – StudioPress has dozens of child themes to choose from which let you instantly change the look and feel of your website without having to change any of the code – and all child themes maintain the same features and benefits of the base Genesis theme. For more advanced developers, there’s full documentation and an active support community to help you develop your own custom child themes.
  • Options for creating customized landing pages for PPC or SEO.

Installation

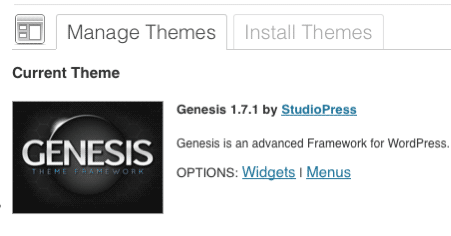
Installation was a breeze. Just either upload the Genesis folder to the “themes” folder on your website, and activate the theme via the WordPress dashboard like you normally would. Done and done.

Genesis features are easy to install

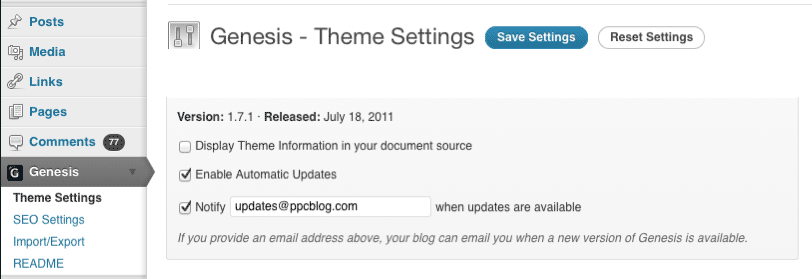
Genesis Theme Settings

This is where  you can set the overall theme settings for your new Genesis powered site. Everything from instant updates, layout options, menu configurations, breadcrumbs and custom headers / footers.

One thing that’s great about the Genesis framework is that they verify the framework is compatible with each an every new WordPress update, and you can enable automatic updates as well as an email notification with an update is available. Keeping your installation up to date is one the most critical tasks for any site running WordPress, and Genesis makes sure you’re always current.

I unselected the option to “Display theme information in the header” as I prefer to keep code bloat down. However I made sure to select automatic updates, as well as have Genesis email me when an update is available:

Genesis Settings Review

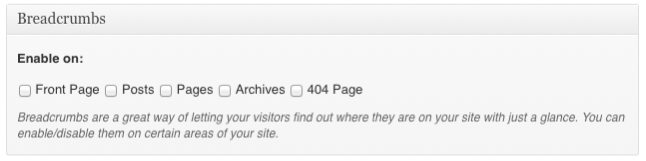
Breadcrumbs – Everyone knows how important breadcrumbs are not just for users to navigate your site easily, but for bots as well. Genesis makes inserting and customizing Breadcrumbs a snap:

Easy use of Breadcrumbs in Genesis

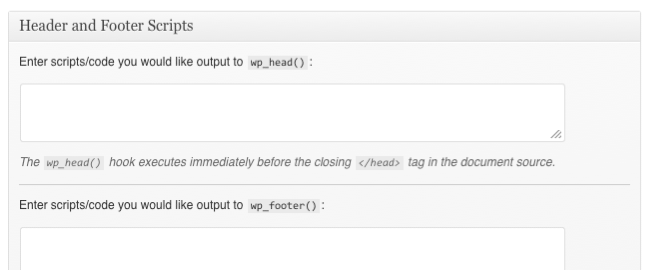
Custom Header & Footer Code – How cool is this? Ever wanted to add some widgets just above your footers? Or load some custom AJAX / Javascript in your headers, without WordPress interfering? Genesis makes this easy as cut and paste:

Custom Headers & Footers

SEO Settings

Now this is one of the most exciting features of the Genesis WordPress framework. The built in SEO options allow you to further customize the excellent out-of-the-box settings to your liking.

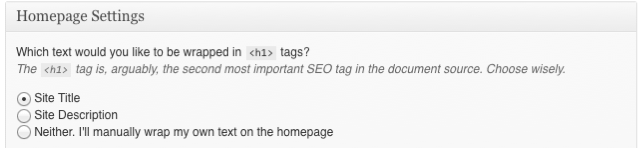
Homepage Settings – Often times the home page of a site is going to be very different than the sub-pages.  You might have different content or be targeting a specific key phrase – the Genesis framework allows you to set a few custom settings including the H1 tag, custom Title and Meta tags as well as Robots meta tags:

The settings page for the Genesis framework

Document Head Settings

This is a very useful feature. The amount of junk that WordPress adds to your headers is incredible (Windows Live Writer anyone?). And while there are plugins you could install to try and remove that code, they come with their own issues. You sure, you could manually remove the useless META data from every one of your WordPress sites, or you could simply let the Genesis framework take care of it with a few clicks:

Genesis Document Head

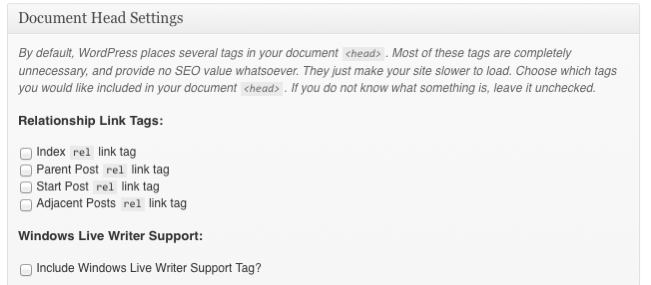
I would leave them all unchecked.

Robots Meta Settings

Again, while there are many plugins you can install to try and manage your Robots META tags, they often run into problems as soon as you start dealing with custom pages and can potentially result in NOINDEX-ing parts of your site or vice-versa. With the Genesis framework you have FULL control over how the META Robots tag works:

Use the framework to control bots

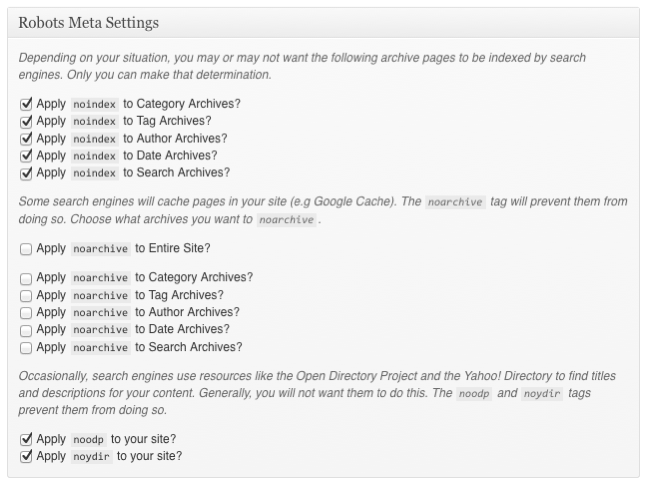
Personally, I would “noindex” author, date and search archives. Depending on how your site is setup and how you’re using Category archives you may want to unselect the default “Apply ‘noindex’ to Category Archives”. You can also apply “noarchive” to various types of pages or to the site as a whole. I generally don’t bother with this, but there are times / sites you may want to apply the “noarchive” tag.

Advantages for PPC

Genesis and the associated themes give you the ability to “hang” custom landing page templates with reduced navigation, no sidebars and tighter calls-to-action off of your site.  It’s also fully compatible with the Premise landing page system as well.  There’s a huge advantage in this, in that Google can see the site behind simply your one or two landing pages and realize that you’re a deep, legitamite advertiser who has more to offer than a single lander alone in the universe.  This helps immensely with their Landing Page Quality Score spidering and scoring.  I can’t understate the importance of this in the current Adwords policy environment.

Also note: Because Google also takes into consideration page load time in your Quality Scores, I recommend you host your Genesis install on a SUPER-fast webhost.  Recognizing the importance of this, the Studiopress team also offers premium high-speed hosting services now as well, I’d recommend having a look.

Summary & Opinion

Having personally gone through the pain of hacking customizations of my own into pre-existing WordPress themes (particularly poorly-coded free themes), I can tell you that you DO NOT want to have to redo all of those customizations every single time you upgrade your WordPress version or theme version.  Genesis makes it easy to ‘silo’ away all of  your customizations so that they stay safe during upgrades to new WordPress releases as well as upgrades to Genesis and child themes as well.

I’ve heard a lot of people say “oh, that’s fine, I don’t plan on upgrading anyway so it doesn’t matter”.  Those are the same people that often get their sites hacked because their running outdated and unpatched versions of WordPress or their theme.  It’s not a question of ‘if’, more like ‘when’ will you be upgrading.

All these advantages coupled with the SEO and PPC lift you can get from deploying your site in a Google-friendly way lead me to highly recommend the Genesis platform.  

The Genesis framework itself is dirt-cheap at $60, and you can layer your own theme over top of that.  You can also install the Genesis on as many sites as you want with one license.  Studiopres has a TON of child themes or skins that you can use out-of-the-box as well if you add them on to your Genesis order, and they have a bundle available that lets you get them all for $299, WAY cheaper than they are individually.  All of their licenses include fantastic support for installation and customization of Genesis on your own site.

Try Genesis out now!

PPCblog Review: Mixrank Competitive Ad Research Tool

No Comments » Written on August 17th, 2011 by
Categories: Display Ads, PPC Tools

I’m always on the hunt for new ways to data mine the competition.

After seeing a beta Adsense competitive research tool called MixRank reviewed by VanillaCoke on the Seobook blog I thought I’d take a bit of time and check it out for myself.  I was also curious to see how it compared with another competitive research tool I’ve reviewed for PPCblog called WhatRunsWhere.  You can read that review here.

In this example I’m looking to dig up data in the health vertical.

First thing you’ll notice when you perform a search on MixRank is the handy auto-suggest feature on the field, ordered with the biggest advertisers on the top. Type in one of you’re broadest keywords and you’re likely to get a whole list of domains who you’ve never though of checking out. I started with health… and clicked on the first result healthline.com

The results appear quickly and when the page comes up it’s logically broken up into text ads, banner ads, and traffic sources.

Starting with text ads, I’m able to immediately see healthline.com’s top variations. The default sort is based on ad frequency, but all the columns are sortable, so by clicking on the publishers column, I can see which ads are getting the widest site distribution. Conveniently, all data is exportable for  those of us who like to crunch data from all directions in Excel.

Flipping to the Ad Reach tab, I’m able to see a graphical representation of the total publishers reached per ad. This is the same metric as the previous screen, but in this case its charted over time, enabling me to quickly spot ads that are being ramped up or phased out. This is also great reminder that summary data can be deceiving. All time best performers aren’t always what works best right now. You need to see ad trends, and with this feature they’re quite clear to see.

MixRank’s best performers tab is pretty self explanatory. It graphs ad performance (based on impressions and average position) over time. Once again, immediately pulling out the ads that are going to be your biggest competition.

On to the banner ads section. I like that MixRank allows you to download all the banners from the ‘download all’ link. I do wish there were some metrics in this area to help me determine which banner ads are performing the strongest, and/or which sizes are getting the most play, but even just having the images and the last seen data (available by clicking on the images) is valuable. Certainly useful for inspiration/strategy on ad design.

MixRank’s  traffic sources section details all the sites healthline.com is getting impression share on. As well as the following data points:

  • Uniques – estimated number of unique visitors
  • Last Seen – the last time MixRank saw the ad
  • Days Seen – number of days in the last month MixRank was shown the ad
  • Average Position – the advertiser’s average position in the AdSense block

For PPC, this is great for identifying sites that could be well suited to your campaigns. It could also be a way to identify where you’re competition isn’t getting traction – and an opportunity to either exclude the domain or optimize your ad content and outperform them.

On the flip, as an Adsense publisher also, taking a look at some of the better performing sites was a bit of an eye-opener on what types of verticals I can optimize for. 🙂

Summing up, if you want to get a leg up on your competition, here’s what you’ll get from MixRank:

  • the competition’s text ad copy and relative performance
  • their banner ads
  • the domains where their ads are showing
  • ad performance trends

While there’s no shortage of spy tools available for Adsense data, going through them, you find that many are so complex that you can’t just get in, get the data and get out without losing a whole chunk of your day.  So far, MixRank appears to be good at distilling the data down to useable, actionable bites.

The *beta* version of MixRank, which is being offered while they ramp up, is also laced with teasers for features that are on the way. I’m quite keen to see what they have in store for the ‘keywords’ and ‘best traffic sources’ tabs.

For the time being, MixRank is free, so go sign-up for the beta and give it a spin. As with all of search tools, it takes a little time for them to build up their database, but so far they’re tracking 93K+ sites, so you’re bound to learn a thing or two.

How to Research Negative Keywords

14 Comments Written on May 3rd, 2011 by
Categories: Analytics, Google Adwords, Keyword Research, PPC Tools

“Negative” keywords are just as important as the ‘positive’ keywords you bid on.  Effective targeting of your Adwords campaigns requires that you put your ads in front of the right users, and keep them away from users who are unlikely to be interested in your product or service.  Many keywords have multiple meanings from niche to niche, others many apply to a particular area of your niche that your product may not want to target.

Poor broad-matching due to inadequate negatives can severely impact your keyword relevance quality scores as well as keyword-level quality scores are heavily measured based on ad click-through rates (CTR), and the more often your ad shows against irrelevant keywords, the lower your CTRs will be.

Different Kinds of Negative Keyword Structures

For search campaigns, negative keywords can be added either on a campaign-wide basis, or on an adgroup-only basis.

Here’s a good rule of thumb for which level of negative you should use:

If there’s no conceivable way that a keyword you’re adding as a negative would apply to ANY of the adgroups in your campaign, add it as a campaign-level negative.  If you only need to apply a particular negative keyword to one of your campaign’s adgroups enter it as an adgroup level negative.

Note: Negatives are not grouped into adgroups the same way positive keywords are. If you want to add a negative keyword to just one adgroup, you enter it like a standard keyword with a minus symbol (-) in front of it, and add it to the adgroup as if it was a positive keyword.

Locating Negative Keywords

Google has a pretty good idea of what keywords relate to each other.  Processing billions of queries per day, they can see patterns in what keywords are being used together, and what the searcher is looking for.

One easy way to leverage Google’s historical data on keyword combinations is by using the Google Adwords Keyword Tool.

For instance, if we’re advertising high-end custom car rims, we’ll want to add as negatives for products we don’t carry, or customers we don’t want (aka. people searching for “cheap”).  Additionally, we might be interested to see what additional terms Google says are commonly used in searches for our phrases (particularly when broad match goes bad).

You’re Not Going to Cover Every Negative With a Brand New Campaign

One of the most effective ways of isolating negative keywords can only happen after you’ve been running your campaign for a few weeks.  Google now provides much-improved reporting on users’ actual, exact search query.

Using the “See Search Terms” report when you’re on the adgroup’s Keyword tab can show you terms Google is incorrectly matching your keyword to.

Negative Match Types

Negative keywords can be entered with the same three match types as regular keywords: exact, phrase, and broad.

If there’s a chance that adding your keyword broad match negative (i.e. no quotes or square brackets) is going to limit your campaign’s ad impressions, you may want to get more specific in telling Google when you’re not OK with that negative.  With negatives, using the broad and phrase matching will prevent your ad from showing more than an exact match negative.

If the negative keyword is clearly off-topic, broad match is typically the best choice.

What’s your favourite method for digging up negatives?  Share them in the comments!

How To Use Google Campaign Experiments To Optimize Adwords

2 Comments Written on December 14th, 2010 by
Categories: PPC Tools

Changing adwords campaigns, particularly established campaigns that are working, can involve a lot of trial and error. We don’t want to ruin a good thing, yet all of us want to optimize for best results.

In August 2010, Google rolled out a helpful tool called Adwords Campaign Experiments, otherwise known as ACE.

ACE is a free tool that enables you to run experimental campaigns, side by side, against your existing campaigns. You can run tests on a percentage of your traffic, as opposed to all of it.

For example, say if you are currently bidding 50 cents on a keyword, what happens if you increase the bid to two dollars? It might be difficult to tell if any increased conversions are related to the increased bid, or some other quirk in the market. ACE will tell you if the changes you see are significant, as you’ll be comparing two different bids, run at – effectively – the same time.

ACE is similar to a slit-run test, but enables you to test settings across entire groups and ad campaigns.

You can find out more about Adwords Campaign Experiments here. Google have since rolled out Campaign Experiments globally. Now, you can test more variables, including the ads themselves.

To access Adwords Experiments, sign into your Google Adwords Account. Under the Settings tab, you’ll find an option labelled “Experiment”

How To Test Using ACE

  • Establish Control Group – Your existing campaign is your control group. You can set this on the status icon on your Ad group.

Create new groups and set these as experiments:

  • Change Match Types – Leave you existing campaign as a control and start an experiment to test different match types. How do different match types affect your CTR? Impressions?
  • Change Ad Groups – how does adding keywords to existing groups affect performance? How does splitting groups up into smaller, more focused themes affect performance? How does removing keyword affect performance?
  • Change Bidding – Shift bids up and down radically. How does bid level affect performance? Be careful with the percentage of traffic you allocate to your test. It needs to be high enough to be statistically significant, however if you set it too high, you might compromise your existing campaigns performance.
  • Keyword Level URLs – How does changing the URL affect performance?
  • Display Network – Change the topics you target on the display network.

Understanding The Results

As the campaign runs, you’ll see separate control and experiment rows, so you can compare data.

Probably the most important aspect of this tool is how clearly you can see if there is a statistical difference in the optimization vs chance. Whilst the numbers may change in your experiment vs control, these numbers may not mean much to your business.

Google makes this data easy to analyze by providing arrows.

  • One (up or down) arrow represents a 5% probability that the metric increased or decreased by chance rather than due to your experimental changes.
  • Two arrows represents a 1% probability
  • Three arrows represents a 0.1% probability

Further Reading:

Review: Google’s Beta Contextual Targeting Tool

Google’s new Contextual Targeting Tool (currently in beta, some accounts have it already, more will see it roll out shortly) is a fantastic way to build out quick and dirty display network campaigns.

Many advertisers build out their content campaigns using variations on the keywords used in their search campaigns, perhaps integrating a few other contextually-related keywords to round out the ‘theme’ of the adgroup, making it easier for Google to figure out where to put your ad, or simply start from scratch using Google’s keyword tool to throw together thematically-relevant keywords into new adgroups.

A Much Easier Approach For Creating Content Campaigns

Google’s new Contextual Targeting Tool however gives you an in-depth look at what types of terms Google thinks are semantically related to your core keywords and also shows you totally new branches of keywords that you might not have ever thought to look for on your own.

Additionally, and perhaps most importantly, the tool allows you to see how Google thinks related terms should be grouped together to make successful content adgroups that they can ‘understand’ in order to place your ads on the right display network pages.

To use the tool, you select a geography and language, then pop in a few sample keywords that are most closely related to whatever it is that you’re selling on Adwords: (click images to enlarge)

The tool then returns a list of pre-made content adgroups and bid suggestions that you can add to your existing campaign, or use to create a new one:

By selecting any of the suggested adgroups, you can edit the keyword phrases Google comes up with: removing keywords that are too geo-specific, or not really relevant to the human eye, or add keywords of your own that you think would round out the adgroup even further.

For instance, in the below highlighted adgroup, you might choose to take out the references to specific states or just have one state mentioned per adgroup:

One of the most important features of this tool is that you can expand out any number of adgroups into an even deeper set of adgroups related to any of the initially-suggested groups.   (Mousing over any of the adgroups reveals an “Expand” button.)

For instance, if we ‘expand’ the initial “Cheap Car Insurance” adgroup, Google suggests a number of additional adgroups they think are deeper derivatives of “Cheap Car Insurance”:

They’ve come up with a number of great ways to expand on “cheap car insurance” including terms like “budget”, “cheap insurance forum”, “cheap auto insurance quotes” and more.  This is MUCH more easier than trying pluck these out of the standard Google keyword tool.

The Contextual Targeting Tool even shows you where, based on these new adgroups, your ads might show up, right down to the exact URL:

Seeing this in advance is equivalent to getting a sneak peek at your Campaign Placement Report before you put the campaign or adgrousp live.  What’s the value of this?  Well, first off you get to see what sites your ads could show on that are NOT appropriate, and should be added as campaign-wide negative site exclusions before these new adgroups are launched.  You may also notice some negative keywords creep in that could be added immediately as campaign-level negative keywords.

Given that we’re looking at car insurance-related adgroups you can likely spot a few sites here that don’t exactly match up to that theme:

So now we’ve got a list of nicely expanded adgroups, that can be exported directly from here into Adwords Editor where you can add text or image ads etc…

WARNING: This export to Adwords Editor feature is handy, but notice that the suggested bids from Google are also exported, and they might be a) higher than is really necessary and b) more than you’re able or willing to pay.  When you import these adgroups into Adwords Editor, be sure to go in and update the Max Content CPC you’re willing to pay so you don’t end up with a bigger than expected spend.

The Value for Search Campaigns, Quality Score & Ad Text

I’ve put together a completely new training module for our PPCblog community members that includes tips and examples on how to use this new Contextual Targeting Tool to expand search campaigns, pump up Keyword Relevance Quality Score, and tweak ad text for higher CTRs.

If you haven’t joined yet, what are you waiting for….?

Sweet! Adcenter Lets Advertisers Segment Search Traffic

24 Comments Written on September 28th, 2010 by
Categories: Microsoft Adcenter, PPC Tools, Yahoo

One of the big advancements that made Yahoo advertising profitable again for a lot of advertisers was a new setting that allowed you to exclude the Yahoo search partner traffic and run your ads exclusively on Yahoo’s core search engine.

With the transition to Adcenter, advertisers lost that control, and I personally wondered when/if Microsoft would roll out similar controls.

Looks like Microsoft’s implementation of this went live today (or very recently at least)…

Hat tip to Matt Umbro for spotting this early and tweeting it out!

Bing Core Search Traffic Selection

Sweet Release

Now advertisers can choose option number 2 under the search network to focus on Bing and Yahoo’s core search traffic exclusively, which in my experience yields much higher conversions at a considerably lower long-term cost.

You can see this new option (provided it’s completely rolled out) by clicking “Create Campaign” and scrolling to the bottom under “Adgroup Settings”.

Update: Switch Your Existing Campaigns to Core Search Only

By default you’ll see that Adcenter has opted you into “All Bing and Yahoo! search networks and syndicated search partners” for your existing Adcenter campaigns.

To change this setting in the Adcenter online UI:

  1. Drill into your campaign and check the box next to “Adgroup” to select all of the adgroups in that particular campaign.
  2. Then click the “More” button and select “Bulk Edit”
  3. From the drop down selector box in the blue area choose “Distribution to Networks” and you can bulk edit your adgroup’s search configuration.

Change Adcenter Campaign to Core Search Only

Easy!

Get a Bird’s Eye View of Automatic Placement Performance

1 Comment » Written on September 27th, 2010 by
Categories: Contextual Advertising, Display Ads, Google Adwords, PPC Tools

I have to say I’m starting to dig how Google’s been rolling reporting features directly into the campaign tabs lately.  I’ve had a love/hate relationship with their new UI in general, but the more I tweak things for quick access, the more it grows on me.

Case in point:  This isn’t a complicated tip, but the way the Networks tab is now laid out, you can get a nice snapshot of your content campaign’s placement performance at the campaign-wide level.

It’s a great way to quickly see which sites you’re spending the most on and how they’re converting for you.

To enable this view:

  1. Go into your content-only campaign and select the Networks tab, do not select an adgroup
  2. Choose a date range that will have a decent amount of data, for instance the last 30 or 60 days.
  3. Select “show details” next to Automatic Placements in the Display Networks section
  4. Be sure you’re viewing at the campaign level, the breadcumb nav will simply show “All online campaigns”

The result is a nice, birds-eye view of which placements are working (or not working) adgroup-by-adgroup.  Have some winners?  Check the box next to the URL and add them to your Managed Placements and fine-tune your bids, or remove them using the “Exclude Placements” button if they’re not performing.

PS: We’ve been discussing how to more effectively crunch domain-level placement data in the long tail to boost ROI. Why not join us?  Details on how to join are available here…

Add New Negative Keywords & Placements On the Fly

The integration of the Search Query Report directly into the Keywords tab of your Search campaigns makes it super-easy to see if your keywords or match types are picking up non-converting or irrelevant searches that should really be added as negatives at an adgroup level at least, or at a campaign level if they’re “way out there”.

It should be noted that the search queries (even in the new UI option) can take a couple of days to fully populate with results, so it’s best to look a decently-sized block of time to make sure the data is valid.

To access your search queries, go into an adgroup and select the Keywords tab and the “See Search Terms” button:

Next, if you see an irrelevant or poorly converting keyword you’d like to add as a negative on-the-fly, check the checkbox next to the keyword and hit the “Add as Negative Keyword” button:

This box then pops up allowing you to choose the match type of that negative keyword (it defaults to adding the keyword as an adgroup-level negative keyword) and you can vary your negative match type depending on how surgical you want to get in avoiding a particular keyword or phrase:

Compared to the old method of cutting and pasting from the Search Query Reports to your various adgroups, this is a MUCH easier and faster way to improve your campaign’s targeting.

Cutting Display Network Placements On-the-Fly

The same approach also works for adding negative site placements to your campaign with some small differences.

To exclude placements quickly (and with all the conversion data right at your fingertips), in your content network campaign, select an adgroup, then hit the “Networks” tab.

On the Networks tab, regardless of whether you’re using Automatic or Managed placements, you’ll see a full list of domains (or URLs) where your ads are showing and how they’re converting.

If you see a dud, hit the checkbox next to the junk placement and click the “Exclude Placements” button:


On the popup box, select whether you want to exclude the domain or URL placement for your entire campaign or only this adgroup.  Because you can often kill the golden goose in another adgroup by doing a campaign-level exclusion, it’s usually best to stick to the adgroup level and evaluate each of your adgroup’s exclusion placements on a group-by-group basis.

All in all, the consolidation in the new UI is speeding things up considerably, it just takes some getting used to:)

Add Impression Share Data to Your Campaign Dashboard

4 Comments Written on August 25th, 2010 by
Categories: Analytics, Google Adwords, PPC Tools

As Google methodically picks off the reports in the Adwords Report Center, moving reporting to an ad-hoc model in the main campaign UI, some interesting little tricks are popping up.

In the past, if you tried to keep track of how much traffic Google is actually sending you compared to how much is truly available, you ran a campaign report and checked the box for “Impression Share”.

Now, that feature is gone from the Report Center, but with the new changes, you can tack it right to your campaign list columns:

Now you’ll be able to view your Impression Share in real time right from the campaigns overview screen:

Pretty Handy!!

How to Setup Custom Adwords Quality Score Alerts

2 Comments Written on August 23rd, 2010 by
Categories: Google Adwords, PPC Tools

Ever thought it would be nice if Google sent you a ping if your top keywords suddenly saw their Quality Scores tank?  How about when you lose your top favorite top ad position?

Google’s new filters give you the ability to configure custom alarms that can alert you via email or SMS when one of your top keywords (or any keyword for that matter) goes inactive or stops firing ads for budget reasons, sudden Quality Score drops, or moves by your competitors.

In addition to watching for traffic stopages, you can also monitor:

  • Avg CPCs
  • Spend Levels (Cost)
  • CTRs
  • Avg Ad Positions
  • Clicks
  • Impressions
  • Conversion Counts
  • Conversion Rates
  • Costs-per-Conversion

You can set up these custom alerts at the Campaign, Adgroup, or Keyword level for specific, selected keywords or adgroups, or ALL of the keywords or adgroups in your campaign if you like.

To enable custom alerts, click on the “More Actions” drop down likeso:

Here’s a screenshot of the settings for doing this at a keyword level, where if the impressions on a top keyword disappear (for whatever reason, but usually QS drop) you’ll get a ping from Google via email (SMS if you give them your mobile number, but who are we kidding they probably already have your number anyway:p ):

I use an alert for “if this top keyword gets less than 1000 impressions in a given day, let me know” to keep on top of critical quality score changes:

Jen at PPC Hero also had some great suggestions on how to use the new Segments capability as well.

Do you have a favorite new alert to keep you on top of your campaigns? Share it in the comments!